Windows, Git, and SSH Keys
7/Nov 2017
Git has the ability to use SSH keys in order to authenticate communications
with a remote server. This is a magical thing! Depending on how you set it
up, you may never have to enter your password again.
You may find differing opinions, of course. My suggestion is to store password-less keys securely on your development system. This may seem like a bad idea, but it’s a pretty common thing to do to make your life easier.
If your laptop/desktop ever gets stolen, it’s pretty easy to revoke it’s key.
Generating Keys
I do 99% of my development on my Windows computer. Windows doesn’t have any
built-in SSH functionality (we’re not talking about WSL right now). That
means that you will wind up installing PuTTY. It’s ok… everybody’s doing
it!
I like to store my SSH keys in my profile directory. This will make your life
a lot easier. The keys will also be slightly protected with your Windows
login information. %USERPROFILE% is also the default place were utilities
will look for your SSH config file.
In a command Window, type: mkdir %USERPROFILE%\.ssh
Generate your first key:
- Open up
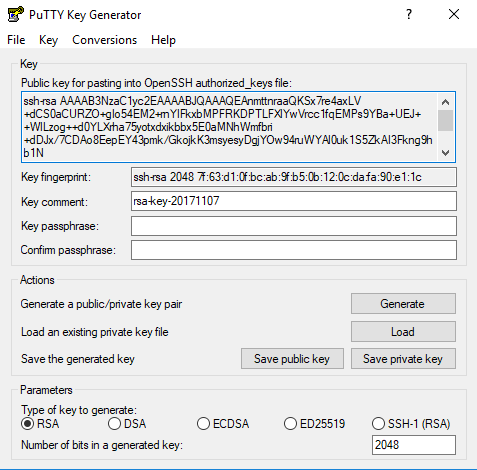
PuTTYGen(might be in your Start menu if you installed it like that) - The default settings of
2048 RSAshould be ok - Press the Generate button
- Move your mouse over the window to generate some randomness
- Export these things to your
%USERPROFILE%\.sshfolder (you can ignore the without a passphrase warnings):- Press Save private key: This will save a file with a
.ppkextension. This is your private key; keep it safe! This should stay on your dev machine.
For this example, name thisdevmachine.ppk - From the menu, select Conversions -> Export OpenSSH Key: This is
your private key exported into something that
gitwill use.
For this example, name thisdevmachine-openssh-private.txt - Keep the Window open… the Public key for pasting is important for a later step.
- Press Save private key: This will save a file with a
Here’s a screenshot of my screen after I generated the key:

%USERPROFILE%.ssh\config
The SSH utilities that don’t use the .ppk directly will want to use the
devmachine-openssh-private.txt file that you exported above. The easiest
way to do this is to create a config file that tells the utilities which
keys to use for which hosts.
Run the following command from the command line (careful here, don’t delete the file if it’s already there!):
type NUL >> %USERPROFILE%\.ssh\config
This will create an emtpy file. Now open that file up in your favorite text
editor. Here’s a sample configuration for github.com:
Host github.com
    StrictHostKeyChecking no
    IdentityFile C:\Users\myusername\.ssh\devmachine-openssh-private.txt
myusername with your user name)
All utilities that support this kind of thing, such as git, will automatically
use this configuration to log in to the remote system (github.com, in this
case).
NOTE: This format of .ssh/config is the same for both Windows and Linux.
GitHub
We’re using GitHub in this example, but this holds true for any other remote host that supports SSH keys (even Linux systems).
- Go into your Settings, and select SSH and GPG keys
- Press the New SSH key button
- Give it an appropriate Title
- Remember the
PuTTYGenwindow you kept open? Copy the text in the Public key for pasting… section (right click, select Select all, then right click and select Copy) - Paste that text into the GitHub page were it says Key.
NOTE: The thing you copy/paste should start withssh-rsaand probably end with== rsa-key-20171107(the numbers would change) - Press the *Add SSH key button at the bottom of the form.
That’s it! Now you can use git clone to clone your repo using the Clone
with SSH option. That will also give you the ability to use git pull and
git push without entering in your password.
Bonus: Linux Server
Have a Linux server already using SSH? Great news, you can follow the same basic steps to allow password-less connections!
GitHub gave us a nice web interface to add the keys. No such luck in Linux (depending on what you think of GUIs). Still, its a relatively simple process.
NOTE: These directions really depend on how sshd is configured; the directions
below are most common.
mkdir -p ~/.sshvim ~/.ssh/authorized_keys(or use a command-line editor your familiar with)- Add in the same text you pasted into GitHub (
ssh-rsa.....== rsa...) - Save the file
- IMPORTANT: Change the permissions:
chmod -R 600 ~/.ssh(things may not work without this)
Back on your Windows machine, make another entry in %USERPROFILE%\.ssh\config
that points to your Linux server.
